DIY pendant lamp - a quick and inexpensive way to light up your home
-
Author
Izabela Seliga -
Date added
- 3088 views
Do you love DIY and have the DIY spirit in you? Or are you looking for a way to furnish your new home more cheaply? You don't have to be a handyman to assemble designer lighting on your own. In this text, we will tell you how to quickly and easily create a stylish and functional pendant lamp. It's time for a great adventure :)
Step 1: Preparation
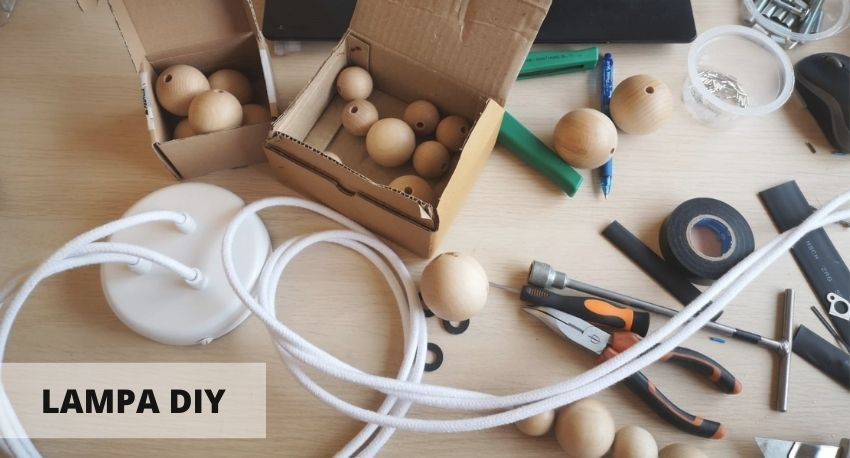
Let's focus on the simplest do-it-yourself lamp. First you need the right components from which to make the lamp. To create a standard loft-style pendant lamp you need the following:
-
1 ceiling rose with a hanger or bracket, otherwise a headliner (choose the number of holes depending on the bulbs you plan to use),
-
light bulb holders (as many holders as holes in the ceiling rose),
-
braided cable - standard or flat (adjust the length to the size of the room and the number of fixtures),
-
electrical cube,
-
decorative bulb,
-
optional: lampshade or decorative elements such as wooden balls, cable holder or a bar on which you braid the cable.

The tools that will help you with the installation are:
-
a sharp knife or wire stripper, scissors can also come to the rescue,
-
insulating tape or transparent adhesive tape,
-
insulated screwdriver,
-
current flow meter (known as a test tube),
-
drill.

Step 2: Lamp holder
Start by securing the area where you cut the cable with insulating tape, which prevents the braid from fraying. Cut the cable where you applied the insulating tape to remove the outer insulation of the cable. Be careful not to cut the strands in the cable - this can risk short-circuiting the cable when it is plugged in. Remove the insulation from the ends of the wires as well (the ends will be connected to the socket later) to separate the blue wire from the brown wire at both ends.


To insert the cable into the holder, unscrew the plastic screw from the cable lock and unscrew the bulb holder itself into its component parts. Secure the cable firmly with insulating tape at the end. Screw it into the holder like a light bulb, in a gentle circular motion (pushing the cable in will cause the braid to slip off), and tighten the end by turning the small screws. Twist each fixture in this way.

Screw in the light bulbs (only do this when the lamp is already hanging - the bulb may break beforehand) - we recommend decorative ones. You can string ornaments, such as wooden balls, onto the cable to give the lighting a boho feel.
Step 3: Ceiling rose
Before you hang your lamp, switch off the plugs. A plugged-in headliner can be dangerous! Take care of safety. Drill holes in the ceiling, drive in the wall plugs and install a mounting arm on the ceiling, to which you later screw the soffit. This will ensure that the soffit fits tightly to the ceiling. Remember to make sure that no wire runs through the drilling area. To reduce the mess, you can use a paper cup which, applied to the drill bit, will collect the loose plaster. Depending on how heavy the lamp will be, think about how many dowels to screw in. For a standard lamp, two will suffice; larger fixtures may require up to four.


Make a loop on one of the cables to put on the cable holder (with cable holders you can easily attach the cable to the ceiling or wall, creating a real decorative installation). Then put the other cables through, if your lamp has several light "rhizomes" :) Usually we have three wires on the ceiling: two phase wires (black or brown) and one neutral (blue), and in some cases also a protective cable, or earth (yellow-green). The phase wires lead to the light switch and the neutral leads to the distribution box. Remove a few cm of insulation from each cable and bend them so that they do not come into contact with each other. Use the cube to connect the ceiling wires to the wires of your lamp. How to do this. Loosen the small screw in the cube and insert the end of the wire into the hole, then tighten. Now you can switch on the fuses and see if the bulb lights up. If it does - bravo! Finally, hang the headliner to hide the dangling wires.


NOTE: To identify which wire is which, carefully turn on the fuses and use a meter to check that current is flowing. The wires where the light comes on are the phase wires and the third wire is the neutral wire. Remember and switch the fuses off again. Never touch the wires with your bare hand!
Step 4: Accessories
Finally, you can spice up the look of your lamp by, for example, selecting a suitable lampshade (in this case, the fixture must have a ring to attach the lampshade - it is worth remembering that not every fixture has this feature). We recommend the use of cord holders, which, hanging from the ceiling, will make it possible to bring light to further corners of the flat. In the case of several overhangs, a great solution is blocking symmetrically distributed on a circular plan, thus creating a loft spider lamp. A railing mounted on the ceiling will also create an interesting effect - wrap braided cables around it. A beam or tree branch can also be used as a railing. If you want to create a unique lighting arrangement, use accessories from the Filè collection by the Italian brand Creative-Cables. Flat wires and special holders will help you conjure up real miracles on the wall or ceiling! Don't forget the matching sockets and switches. Especially those made of ceramic look beautiful.

Here's our recipe for the DIY lamp of your dreams in 30 minutes. Will you take up the challenge?
